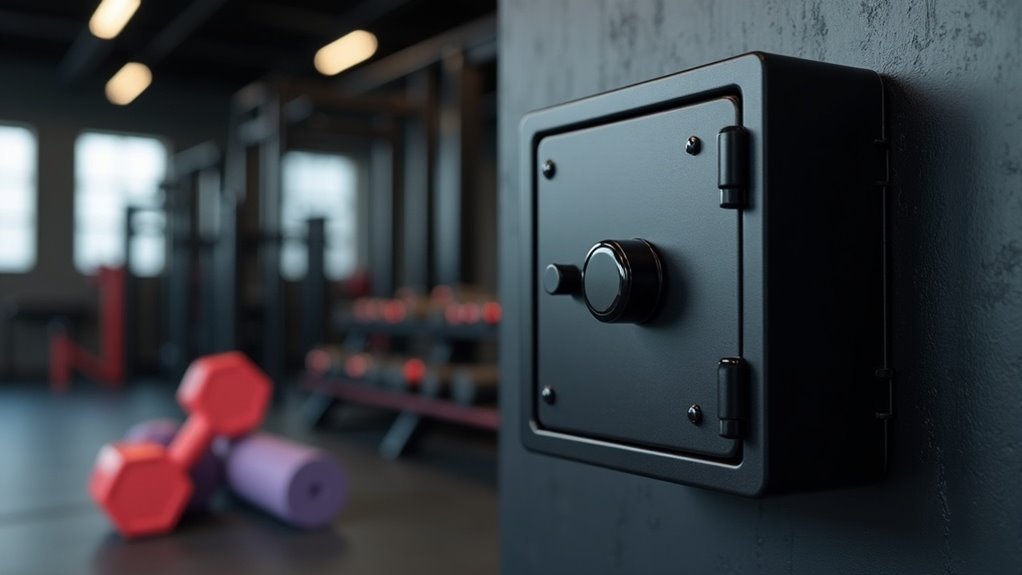
To anchor a safe in your home gym, begin by selecting a discreet location that balances security and accessibility, while avoiding areas that may be prone to moisture. Next, prepare the safe for installation by marking and drilling anchor holes into a sturdy floor surface. Insert bolts to secure the safe, ensuring it remains tight and stable. Finally, use a reliable lock to protect your valuables, and make it a habit to regularly maintain your equipment for ongoing security. Remember, creating a secure environment for your small valuables is essential as you focus on your fitness journey at home.
Key Takeaways
- Select a discreet location in your home gym that is secure yet easily accessible for quick use of your safe.
- Mark and drill holes in a sturdy concrete or wooden surface to anchor the safe securely.
- Use appropriate masonry or wood drill bits and vacuum dust after drilling for a clean installation.
- Insert and tighten bolts or screws to ensure the safe is stable and secure against movement.
- Regularly inspect and maintain the safe’s lock and anchoring for optimal security and functionality, ensuring your small valuables are protected while you focus on your fitness journey.
Choosing the Location for the Safe
When choosing a location for your gym safe, it’s essential to find a balance between security and accessibility. Opt for a discreet spot that isn’t easily discoverable by potential intruders, ideally away from common search areas.
Be mindful to steer clear of locations that are prone to flooding or extreme weather, as these conditions can damage your valuable fitness equipment. Ensure the surface is sturdy, preferably concrete, to provide a solid anchor for your safe.
Check that the mounting holes are accessible and that the door has enough clearance for smooth operation. Additionally, consider the safe’s dimensions and weight to ensure it fits comfortably without obstructing your workout space.
Prioritize both safety and practicality to keep your home gym secure.
Preparing the Safe for Installation
To prepare your home gym equipment for installation, start by opening any compartments or access points to ensure everything is ready for setup.
Position your equipment carefully to guarantee it meets all requirements for safety and usability. Follow these steps:
- Move the equipment into its designated area, ensuring it’s easily accessible for workouts.
- Verify that there’s adequate space around each piece of equipment for safe movement and operation.
- Adjust the position as necessary to avoid future complications or obstructions during your workouts.
- Ensure that each piece of equipment is stable and secure before using it.
Taking these precautions will help protect your investment and guarantee a successful setup process for your home gym.
Marking the Drill Holes and Drilling the Anchor Holes
Before you start setting up your home gym equipment, it’s essential to accurately mark the drill holes for securing your equipment safely. Use a pencil to mark the hole locations on the floor through the mounting holes of your equipment.
If needed, move the equipment aside for easier access and clear any obstructive flooring elements, like carpet.
For concrete floors, choose the largest diameter drill bit that suits your equipment’s mounting holes and select appropriate anchor bolts that match that diameter. Use masonry drill bits for concrete and tile or wood drill bits for laminate flooring.
After drilling, vacuum up any dust to maintain a clean and organized workout space.
Inserting the Bolts
Once you’ve confirmed your home gym equipment is perfectly positioned for easy access and optimal workout space, it’s time to secure it in place.
Follow these steps for a stable installation:
- Use a vacuum to clear dust and debris from the workout area.
- Align your equipment according to your workout plan to ensure proper spacing and functionality.
- Tighten any bolts or screws securely with a wrench or socket set, ensuring everything fits snugly for maximum stability during your workouts.
- Test the stability of your equipment by applying pressure and moving it slightly to confirm it remains secure, allowing you to focus on your fitness goals without worry.
Securing the Safe With a Lock
Securing your home gym equipment with a reliable locking mechanism is crucial for protecting your valuable fitness gear. Consider investing in a digital keypad or combination lock made from durable materials like hardened steel to deter forced entry. Regularly update your access code, especially if multiple family members or friends are using your equipment. Adding a padlock or a secondary locking system can further enhance your security. Always keep a record of your lock combination or access code in a safe place to prevent lockouts.
| Lock Type | Key Feature |
|---|---|
| Combination Lock | User-defined access code |
| Digital Keypad | Quick access with pin code |
| Padlock | Extra layer of protection |
| Hardened Steel Lock | Enhanced tampering resistance |
Regular Maintenance and Inspections
To guarantee that your safe remains a reliable protector of your home gym equipment, regular maintenance and inspections are essential.
Follow these safety tips to keep your valuables secure while you focus on staying fit:
- Inspect for signs of wear or damage, paying close attention to the locking mechanism and hinges.
- Conduct maintenance checks every six months to ensure the safe is securely anchored and stable, providing peace of mind as you work out.
- Clean both the exterior and interior periodically to prevent dust buildup that could hinder the locking mechanism from functioning properly.
- Test all security features, including electronic components, and address any issues promptly to ensure optimal protection for your equipment.
Keeping track of these checks helps maintain your safe’s condition and effectiveness, allowing you to concentrate on your fitness journey at home.